Manual Provisioning
Overview
Manual provisioning allows you to configure your desk phones manually if auto provisioning is not available.
Cisco SPA Series
-
Access the Web Interface:
- Enter the phone's IP address into your web browser.
- Log in as an admin and navigate to the advanced settings.
-
SIP Tab Configuration:
- Set the RTP packet size to 0.020.
-
Regional Tab Configuration:
- Set the local timezone and daylight saving rules.
-
Phone Tab Configuration:
- Enter the station name, display name, and voicemail number.
- Set the handset input gain to 6.
-
User Tab Configuration:
- Configure the date format to day/month.
-
Extension Tab (EXT 1) Configuration:
- Set the proxy address to the PBX IP address and register expire to 60.
- Enter the subscriber information including display name, password, and user ID.
-
System Tab Configuration:
- Configure the IP details for the local network.
Grandstream HT802
Logging into the HT802's Management Portal
- Plug an analog phone into the FX1 Port.
- Dial *** (triple star).
- Select option 02 at the prompt.
The device's IP Address will be now read back to you.
Enter the IP Address into your web browser.
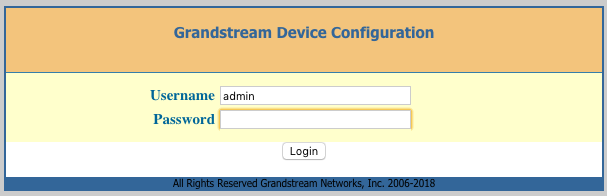
If this is a new HT802, Grandstream sets the default credentials to:
- Username: admin
- Password: admin
Click 'Login‘.
Security Settings
Reset Admin, User, and Viewer Passwords
Click on the 'Basic‘ tab.

It is strongly recommended that you reset the above passwords immediately.
Click on the 'Admin‘ tab.

It is strongly recommended that you reset the above password immediately.
Note
Not resetting the above passwords can lead to toll fraud and very high bills.
Disable HTTP Access
Click on the 'Basic' tab.
- Set 'Web Access Mode‘ to HTTPS only.
- Set 'Disable SSH' to 'Yes'.
Network Settings
Click on the 'Basic‘ tab.
You can configure your needed network settings on this page.
Click 'Apply‘ when finished.
You will need to reboot the device for your changes to apply correctly.
SIP Configuration
Click on the 'FXS PORT1’ tab.
- Set ‘Account Active’ to 'Yes‘.
- Set 'Primary SIP Server’ to the PBX domain (e.g., pinetree.mycloudpbx.com.au).
- Set 'SIP Transport‘ to 'TCP’.
- Set 'NAT Traversal‘ to 'Keep-Alive’.
- Set 'SIP User ID‘ to the ’Extension Number’.
- Set 'Authenticate ID‘ to the 'Extension Number’.
- Set 'Authenticate Password‘ to the 'Extension Password’.
- Set 'Register Expiration‘ to '1’ (minutes).
- Set 'Reregister before Expiration‘ to '15’ (seconds).
- Set 'Enable SIP OPTIONS Keep Alive‘ to 'YES’.
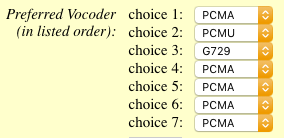
- Set the 'Preferred Vocoder' order as follows.
Factory Resetting the Device
- Plug in and power on the ATA.
- Locate the indented 'RESET' button between the power and ethernet port on the rear of the device.
- Use a paper clip to press and hold the reset button for 10 seconds. Do not release the button until all 4 lights on the top of the ATA flash for 1-2 seconds.
Tip
The ATA may reboot several times before the factory reset is completed.
Yealink Handsets
Yealink handsets should for the most part be automated using the online redirector service (RPS), however this guide will step you through the manual process.
Obtain the login credentials
The login credentials will be one of the following:
-
If the phone has never been used before (or has been factory reset), the phone will have the default username and password set by Yealink from the factory is
admin/admin. -
If you have manually changed the password, then use that password.
-
If the phone is already configured with myCloudPBX, then the password will be visible within the Configuration Portal.
- From within the
Offices & Userspage, Select the extension from the list, then clickManage User. - Click the
Handsetstab, then click theeditbutton for the handset. - Expand the
Advanced Options. - You'll see the
Web Administration Passwordhere.
- From within the
Tip
Note You will need to have enabled Two Factor Authentication (2FA) on your account to be able to view the Web Administration Password.
Obtain the local IP Address of the phone.
- Ensure the handset is plugged in and powered on. (The network cable should be plugged in to the port named 'Internet'.
- Press the “Menu” button on your Yealink phone.
- Navigate to “Status” and select it.
- Look for “Network” or “IP” information. The IP address should be listed there.
Tip
If the phone does not display an IPv4 address, then make sure you have plugged the phone into the local network correctly before proceeding.
Login to the Web Administration Portal
- From within your preferred web browser, enter the url
https://<ip_address>/Note: Replace thewith the IP Address from the last step. ( eg: https://192.168.1.21` ). - Enter the login credentials, then click the
Loginbutton.
Adding the Profile Rule
- Click the
Settingsmenu, then selectAuto Provision. - In the
Server URLsection, enterhttps://ps.mycloudpbx.com.au. - At the bottom of the page click
Confirm. - Once the page refreshes, click
Auto Provision Now.
Tip
Note: For the phone to be allowed to download configuration, you will need to ensure that your public IP Address is allowed in the myCloudPBX Firewall.
This is done within the ChannelHaus Portal at https://portal.channelhaus.com.au under the Admin > Firewall Rules menu.
Usage
- Use manual provisioning if auto provisioning is not available or for advanced custom configurations.
- Ensure all settings are correctly entered to avoid any issues with phone registration and functionality.
Best Practices
- Regularly update phone firmware to ensure compatibility with the PBX system.