Offices and Users
Overview
The Offices and Users section allows you to manage offices and the users within each office. From this page you can create and configure users for myCloudPBX, Microsoft Teams, and IP PBX services, including security permissions, myCloudPBX Softphone access, and myCloudPBX Connect settings.
On the Overview screen you will see three main panels.
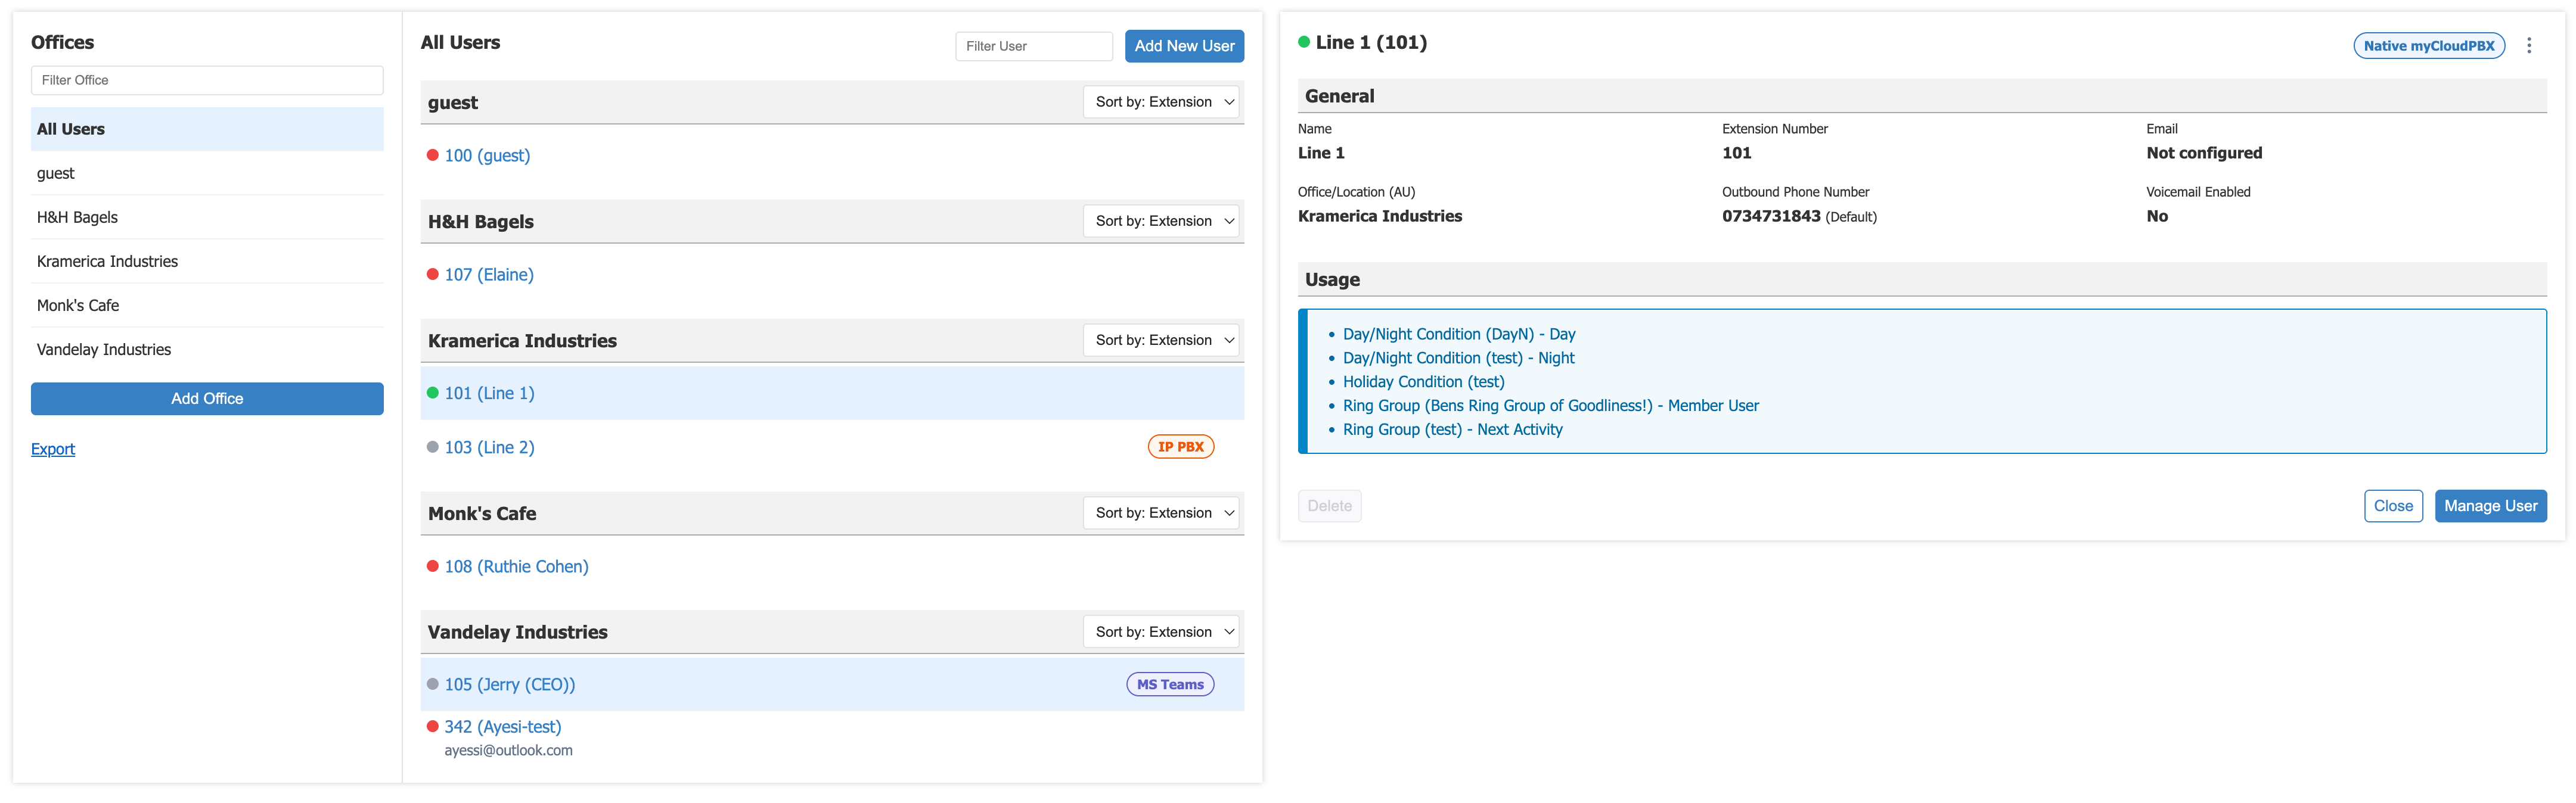
Left-hand Menu Panel
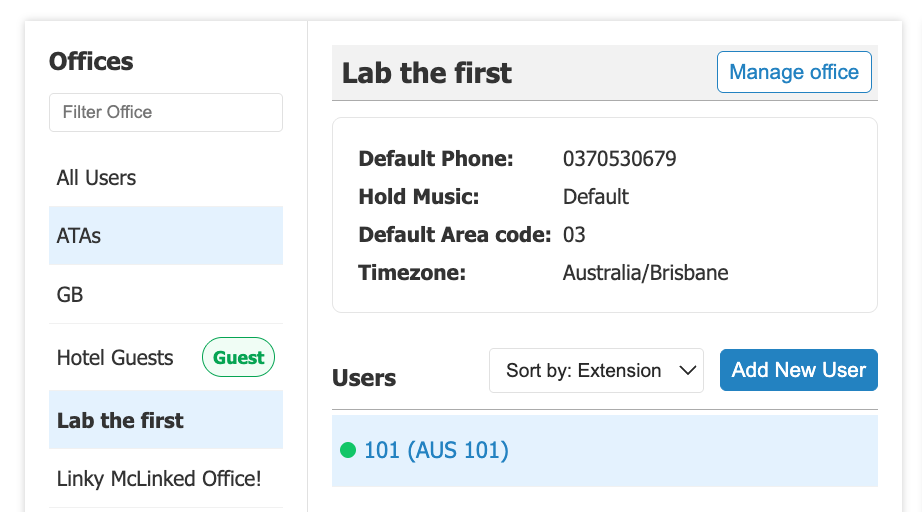
In the Left-hand menu panel you can see a list of all of your existing Office groupings.
- Select any Office to filter the user listing to just that grouping.
- Use the 'Filter Office' to search for a specific Office.
- Click 'Add Office' to create a new Office grouping.
- Click 'Export' for a CSV listing of Users for the PBX or specific Office.
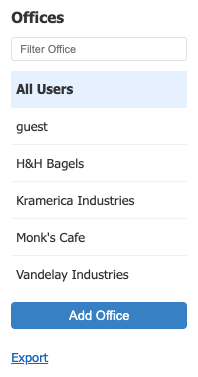
Center Menu Panel
In the Center panel you can see a list of all of the users.
- Use the 'Filter User' to search for a specific User.
- Click on any 'User' to manage the User settings.
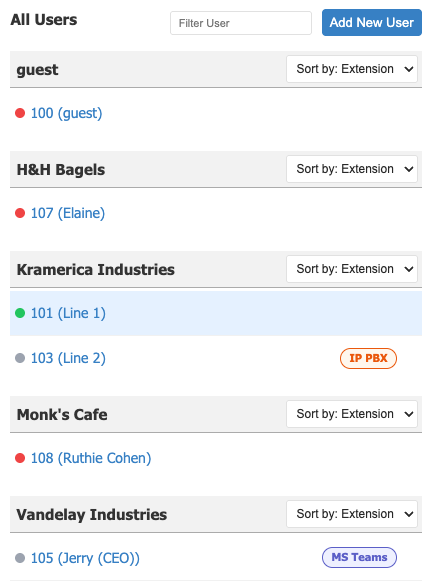
Right-hand Overview Panel
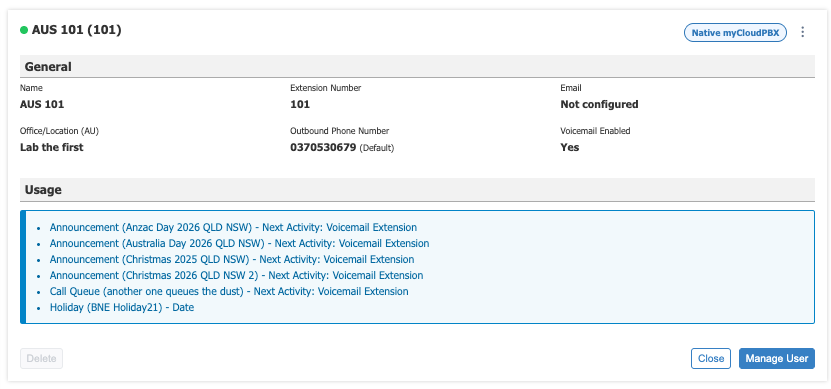
In the Overview Panel, you can see the basic information about the User, including:
- Name: Description for the user, eg: Kramer or Monks Cafe.
- Extension Number: This is the 3 or 4 digit extension number for the User. Calls to this number will ring on any and all devices the User has online.
- Email: The Users email address. Used for Voicemail, and other PBX related mail.
- Office/Location: The Office grouping defines details such as the Users on hold music, outbound Caller ID, and area code (used when dialing 8 digit numbers).
- Outbound Phone Number: This is the Caller ID configured for the User.
- Voicemail: Voicemail status for the User.
Click 'Manage User' to open the Management Panel to modify the User settings.
Quick Actions
Rename a User
These steps can also be used for common User setting changes, such as updating a User's voicemail email address or PIN, adjusting ring time or caller ID, and similar User account updates.
- Navigate to 'Offices and Users'.
-
Use 'Filter User' or select the relevant Office from the left-hand menu to locate the User.
-
Click on the User, then click 'Manage User' to open the Management Panel.
-
Under Account Information, update the Name field.
-
Press 'Save and Close' once finished.
- Click 'Apply Changes' to apply the configuration to your PBX.
Tip
Note: This updates the User's display name, including the name shown on other handsets when calling internally.
For the changes to take effect, any affected handset will require a quick reboot, which can be done by simply unplugging it from its power source for 10 seconds.
The phone will then download its updates.
Office Configuration
- Navigate to 'Offices and Users'.
- Choose one of the following:
- To create a 'new office', select 'Add Office' from the left-hand menu.
- To manage an existing office, select the office from the left-hand menu, then click 'Manage Office'.
-
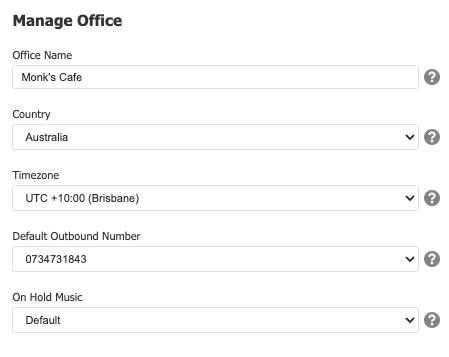
Enter or update the following information:
- Office Name: This is for your reference, such as a logical grouping of users.
- Country: Select the country the users will be calling out from, where the phone number belongs.
- Timezone: Select the timezone.
- Default Outbound Number: The caller ID you'll use for your outbound calls.
- On Hold Music: If you call someone, then put them on hold, this is the music they'll hear while waiting.
-
Press 'Save' once finished.
User Configuration
Creating a new user
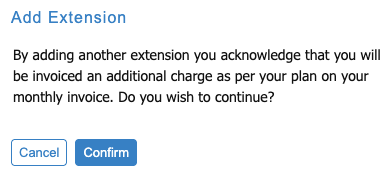
To create a new user, navigate to the 'Offices & Users' section from the PBX Configuration screen, then click 'Add New User'. If prompted with a message, click 'Confirm' to proceed.
Adjust the following as per your requirements:
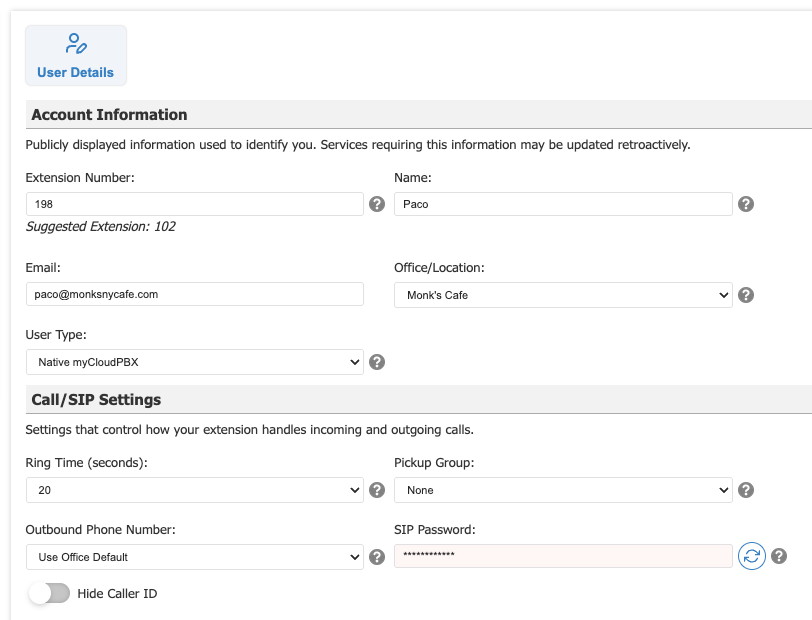
Account Information Publicly displayed information used to identify the user. Services requiring this information may be updated retroactively.
- Extension Number: The extension number assigned to the User. When creating the first User on the PBX, choose either 3 or 4 digit extension numbers. You cannot mix both lengths.
- Name: The User's display name will show on other handsets when you call them.
- Email: The Users email address. Used for Voicemail, and other PBX related mail.
- Office/Location: The Office grouping the User belongs to.
- User Type: The type of User being configured. Choose between 'native myCloudPBX', Microsoft Teams, IP PBX.
Call/SIP Settings Settings that control how the extension handles incoming and outgoing calls.
- Ring Time: How long calls made directly to the User will ring before flowing through to personal Voicemail (if configured).
- Pickup Group: The pickup group assigned to the User, if applicable.
- Outbound Phone Number: The caller ID used for outbound calls.
- Hide Caller ID: Optionally hides the caller ID for outbound calls.
- SIP Password: The SIP password used by the extension.
Voicemail Settings: Controls for enabling voicemail and securing message access with a personal PIN.
- Enable Voicemail for this user: Turns voicemail on for the User.
- Voicemail PIN: The PIN used to access voicemail.
- Send voicemails by email: Sends voicemail messages to the User's email address.
- Email: The email address voicemail notifications or messages are sent to.
- Enable phone & App Voicemail Access: Keeps messages on the server for 90 days so they can be accessed from a phone or app.
Click 'Create User' when finished.
Once the page refreshes, you'll now see the following new menu items:
- User Details: View and update the User's core account information, call settings, and voicemail settings.
- Handsets: Add and manage physical handsets assigned to the User.
- Features: Configure call diversions and direct inbound number settings for the User.
- Apps: Enable myCloudPBX Softphone and myCloudPBX Connect CRM integration access.
- Security: Manage enabled call types, management permissions, call recording, and related security settings.

Deleting a user
To delete a User: 1. Navigate to the 'Offices & Users' section from the PBX Configuration screen. 2. Select the user you want to modify. 3. Click the 'Delete' button. 4. You'll see the following prompt, click 'Delete User' to continue.

Note: In the event that the delete button is greyed out, the 'Usage' section will tell you where the user is configured. First, remove the user from the existing configuration first, then return and you'll see the delete button will no longer be greyed out.

Auto Provision
Callback and Smart Calling
-
Enable Callback:
- Check this box to receive a callback from an internal extension when the user you are calling is busy.
-
Enable Smart Calling:
- Check this box to forward calls to your mobile and your extension simultaneously.
- Set the Smart Call Timeout and Smart Call Type (e.g., Sequential).
- Enter the Smart Call Number (e.g., 04xxxxxxxx or 07xxxxxxxx).
Call Diversions
-
Divert all calls:
- Check this box to divert all calls to another number.
-
Divert calls on no answer:
- Check this box to divert calls only when there is no answer.
Security and Other Features
-
Enabled Calls:
- Select the types of calls allowed (e.g., Local, National, Mobile, International).
-
Allow Management of:
- Choose what can be managed via the handset (e.g., Update settings, Toggle Day/Night mode, Update recordings, Enable In Call Shortcuts).
-
Other Features:
- Check if applicable (e.g., Override Account Code Dialling, Record calls from this extension).
-
Training Mode:
- Optionally enable Training Mode or Extension Privacy.
Saving Changes
- Scroll down the page and click 'Save' when you are finished.
- Click 'Apply Changes' to apply the configuration to your PBX.
Accessing Voicemail
- To access the Voicemail system, dial 777 from your phone, or press the 'Voicemail' Button on your handset if it has one.
- Enter your PIN followed by the # key to authenticate and manage your voicemail messages.
This comprehensive guide should assist in creating and managing extensions effectively.