Number Porting - Australia
Port Australian Number
This section will guide you through the process of porting an Australian phone number to myCloudPBX.
Australian Number Porting Timelines
| Porting Category | Description | Porting Timeframe |
|---|---|---|
| Cat A | Simple ports (single line, no complex services) | 1-5 business days |
| Cat C | Complex ports (multiple lines, complex services) | 5-10 business days |
Notes:
- Timeframes listed is the time after the losing/existing carrier has acknowledged the porting request.
- Timeframes can vary based on the specific circumstances of the porting request.
- Weekends and public holidays may affect the porting timelines.
- Ensure all required documentation is provided to avoid delays.
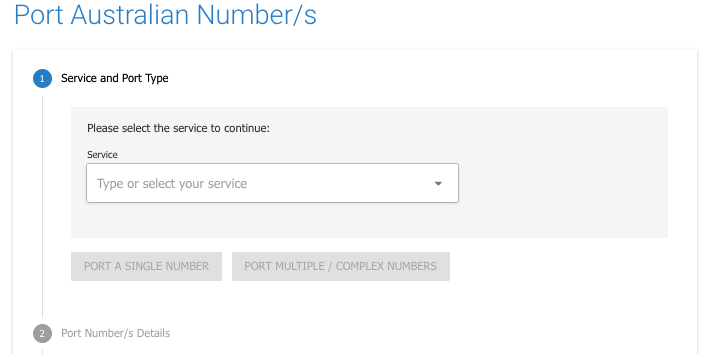
Step 1: Service and Port Type
- Navigate to the "Port Australian Number" page.
- In the Service and Port Type section, select the service you want to associate the ported number with from the dropdown menu.
- Choose the type of porting action:
- Port a Single Number: For individual numbers.
- Port Multiple / Complex Numbers: For ranges or multiple numbers.
- Click the appropriate button to proceed.
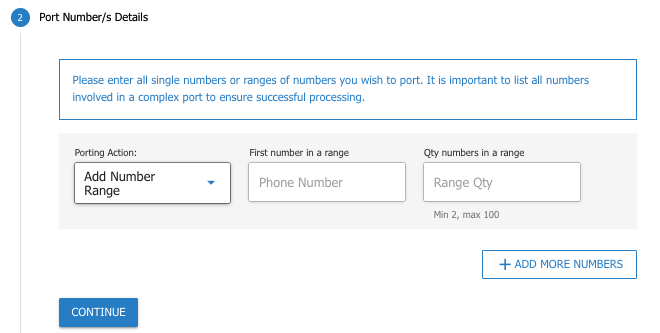
Step 2: Port Number/s Details
- For single number porting:
- Enter the phone number you wish to port in the provided field.
- For multiple or complex number porting:
- Select the porting action (Add Number or Add Number Range).
- Enter the first number in the range and the quantity of numbers in the range.
- Click Add More Numbers if you need to port additional numbers or ranges.
- Click Continue to proceed.
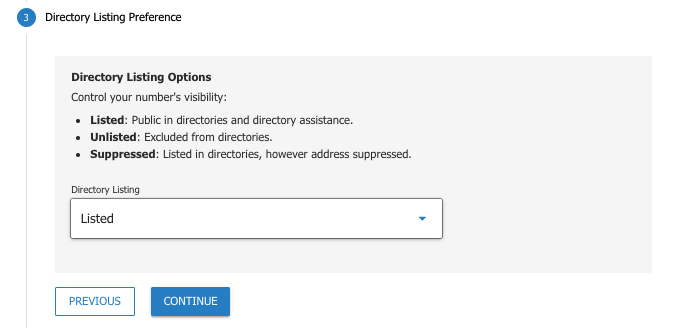
Step 3: Directory Listing Preference
- In the Directory Listing Preference section, select the visibility preference for your number:
- Listed: Public in directories and directory assistance.
- Unlisted: Excluded from directories.
- Suppressed: Listed in directories but with the address suppressed.
- Click Continue to proceed.
Step 4: Emergency Services Address and Number Owner Details
- In the Emergency Services Address and Number Owner Details section, choose to either:
- Select an existing address from the dropdown menu.
- Add a new address by clicking the Add New Address button and filling in the required details.
- Click Continue with Selected Address to proceed.
Due to government regulations, every Australian landline number must have an emergency address record for prompt and accurate emergency response.
Step 5: Order Details
- In the Order Details section, provide the necessary information:
- Porting Contact Person: Enter the name and contact number of the person responsible for the port.
- Authorisation Confirmation: Enter the details of the authorised contact who approves the port.
- Telecom Bill Upload (Optional): Upload the most recent invoice from your current provider to aid the porting process.
- Additional Details (Optional): Enter any notes or customer reference information.
- Review and accept the General Terms and Conditions.
- Click the Agree to the Terms and Conditions checkbox.
- Click the Continue button to complete the porting order.